
Stitch Types in Machine Embroidery and Digitizing: The Only Stitch
I’m going back to basics for this month’s post. We’ll start simply with a review of common machine embroidery stitch types and a short jaunt into digitizing history.
The essential truth about machine embroidery is that there’s technically only one possible stitch. Your most amazing standard embroidery machine makes the same interlock stitch that any sewing machine has since the refined straight stitch machine.
This single stitch, a line from point to point, is the building block for everything we make, unlike the wizardry of knots, loops, and woven stitches available to our hand-stitching brothers and sisters. Moreover, we can only work on the face of our piece. The image below describes our stitch, the only difference is that an embroidery machine lets us control the direction and distance our work piece moves between the needle drops, and whether or not the needle drops at all. The strength of digitizing is that despite what might seem limiting to some, we do have the ability to create combinations of these single stitches readily and quickly, and to programmatically repeat them – this is where our stitch types find their origin.
The digitizers of early computerized machine embroidery could only create designs by placing literally one stitch at a time, stacking up those point-to-point lines while following huge 6:1 blueprints sometimes referred to as ‘cartoons’ by picking out their coordinates on huge digitizing tablets. In those days, artists drafted their designs and marked off measurement lines that helped the digitizer maintain the proper space between stitches or ‘density’. More recently, digitizing software gave us the ability to fill areas or follow lines with automatically generated patterns and combinations. These useful sequences of stitches, well known to the punchers and digitizers of old, became the common stitch types of modern machine embroidery. In the following detail from my frequently-shared carousel horse design, you can plainly see how single stitches in basic combinations come together to form complex elements. Of these elemental combinations, three stand out as the most essential.

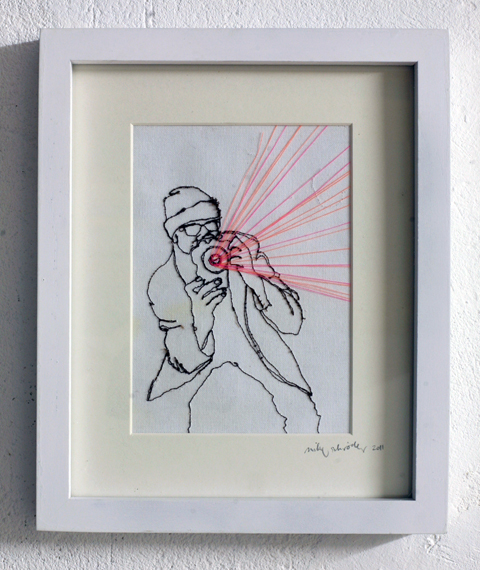
First is the ‘Straight Stitch’. This is, at its base, a line of repeated single stitches. Effects are achieved by varying stitch length: long stitches are shinier, smoother than the pebbly, tight look of short stitches. We can also vary how many passes we make over an element for thicker and thinner lines. ‘Straight Stitch’ is generally comprised of stitches of the same length, but digitizing software can vary stitch length automatically to track tight curves. The ‘Manual Stitch’ is a close cousin- the direct descendant of the tools of those first digitizers, letting us plot each stitch individually. Straight stitches are used in small detail work, manual shading, outlining, and single color drawing of all kinds, not to mention redwork and other single-color designs like the botanical-engraving inspired dogwood flower below.

The second is the ‘Satin Stitch’ or ‘Column Stitch’. If you’ve seen machine embroidered text, it was almost assuredly comprised of satins. The custom rocker below features classic satin-stitched blackletter text in all its shiny glory. Satin stitches track back and forth over a narrow area, alternating between an angled stitch and a straight stitch, like a zig-zag with every other stitch perpendicular to the area’s edges. The satin stitch has a shiny finish due to the unbroken, long threads in those straight passes. It is most often used for narrow elements- think borders, strokes in text, and anything that’s less than about a centimeter across.

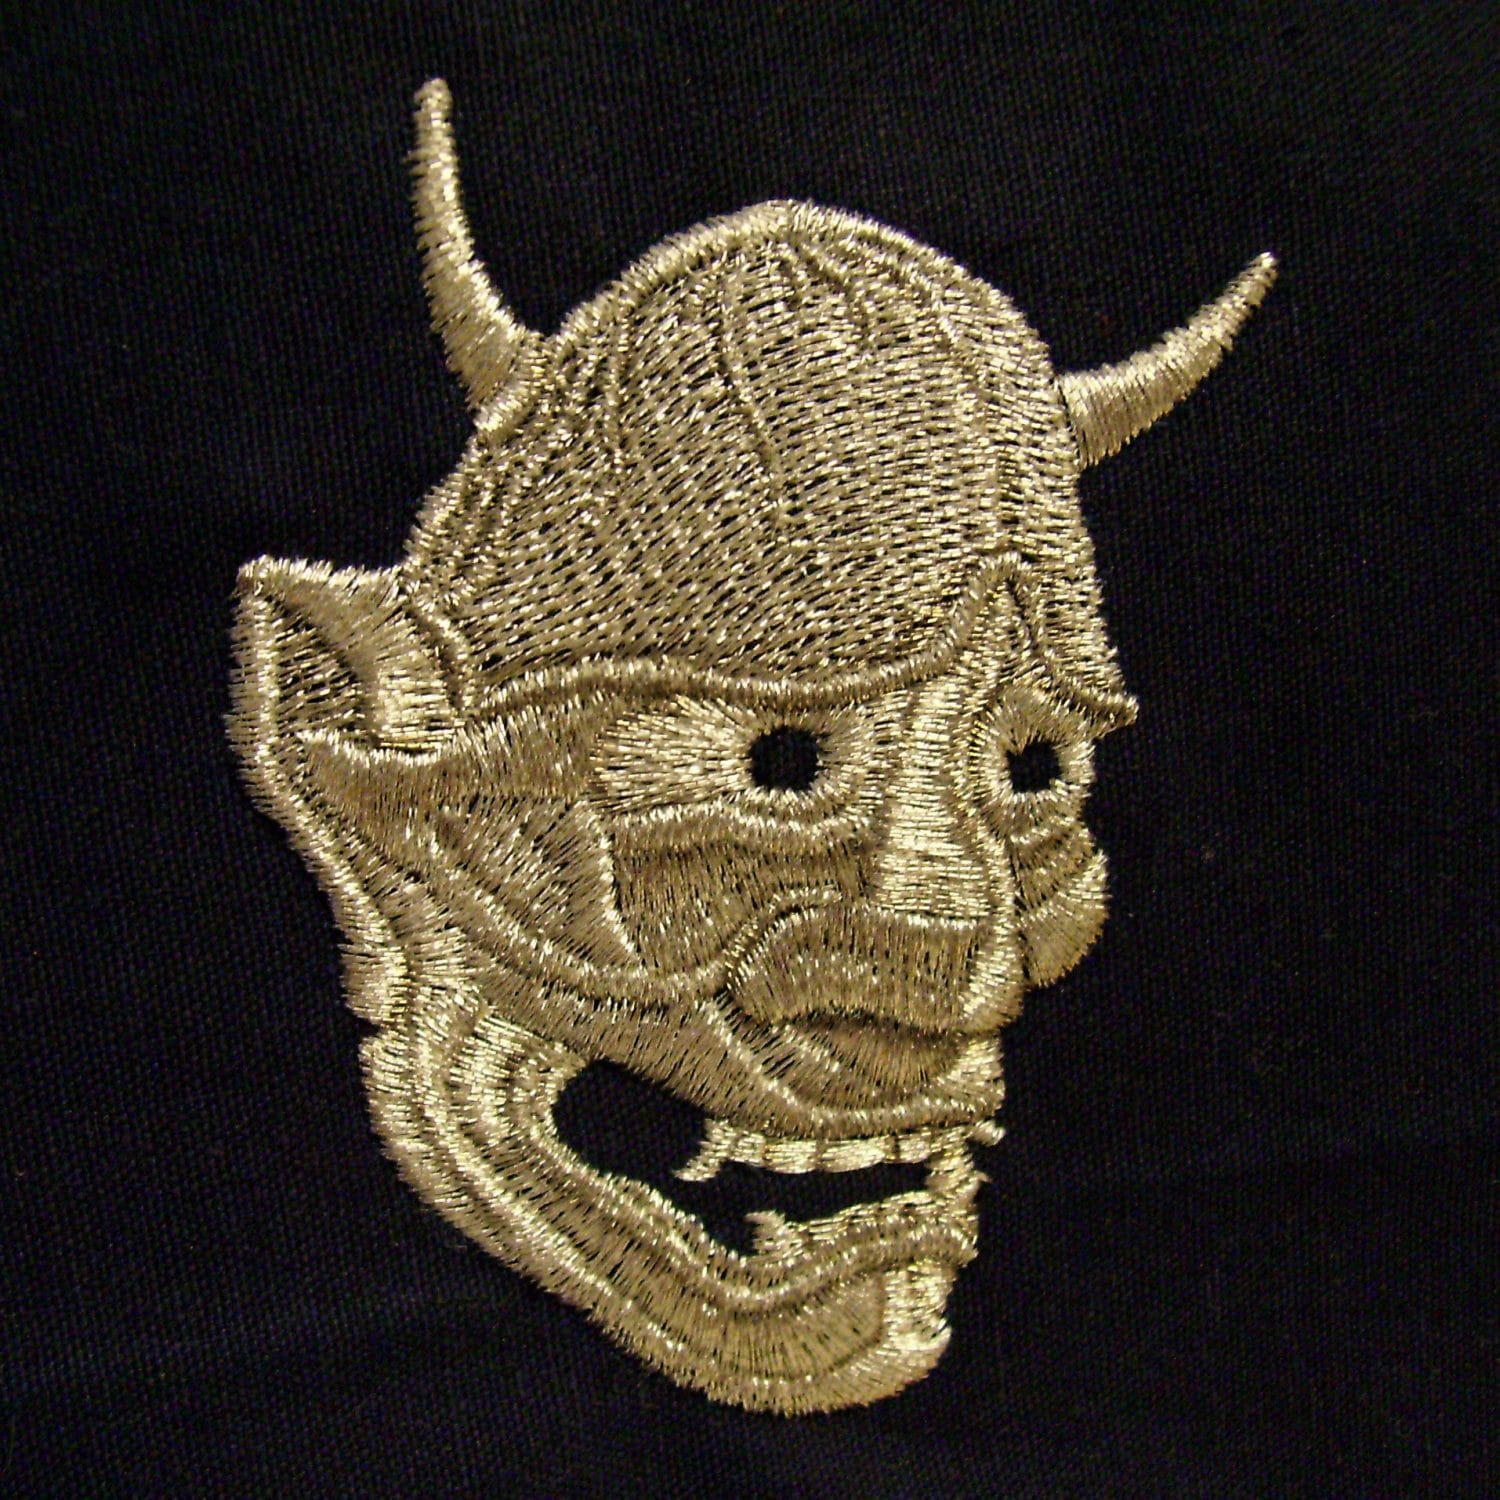
Sculpturally-minded digitizers use satins to enhance the dimension of a piece due to its high sheen, raised ‘crown’ and propensity for showing light and shadow. I created the Hannya mask design below in a single color; all the depth and definition is due to the nature of the satin stitches. Even so, satins are limited by the fact that machines won’t execute them over 12mm in width without slowing, and that these extremely long stitches tend to be loose, loopy and snag on anything that will see wear.

Third in this basic set is the ‘Fill Stitch’, ‘Ceeding Stitch’, or ‘Tatami Stitch’. It is comprised of lines of straight stitches, most often worked very closely to each other so as to completely cover the ground surface, though that ‘density’ can be varied for a number of effects. The stitch penetrations in a fill are alternated line to line in such a way that they look almost like a woven material, hence the name ‘Tatami’ after the traditional Japanese woven mats. The design below features several flat fills laid at a common angle to facilitate color blending.

Fill stitches are used to cover large areas in a design. They have a flat look and less sheen than a satin stitch, but they can fill an area much larger than is easily achieved by the limits of the satin stitch and avoid the rippled texture that areas filled with overlapped satins will tend to have.
The fill stitch can be altered through changing the spacing and alignment of its stitch penetrations and stitch length to create various textures. Innovations in higher end software have even allowed for curved lines of stitching in fills, allowing a sense of enhanced contour. Though carved satins make up the wings and limbs in the piece below, two areas of curved fill give volume and coverage to the body and haunch. Fill stitches without these curves can seem flat, and some digitizers will lean too heavily on fills due to the ease of rapidly covering awkwardly shaped areas with them in digitizing software. This can sometimes give their designs a flat and lifeless look. That said, color blending of incredible delicacy is almost entirely rendered in the same flat, unidirectional fill.

Understanding that these stitch types can be broken down into a series of single stitches reveals a powerful secret. No matter your tools or their limitations, if you have time and enough perseverance, you can create anything with manual, single-stitch digitizing that someone with more complicated software can achieve, and with finer control to boot. Is it easier and faster to create with more complex, automatic tools? Yes, absolutely. Even so, some of the best work I’ve seen was achieved with knowledge, the manual stitch tool, and time. For example, I digitized the piece below entirely with manually defined stitches to achieve this hand-tooled look, using very limited, DOS-based software. It remains one of my favorite, and perhaps one of my finest pieces.

Once you know how stitch types are constructed and why it is that they look the way they do is key to finding your own expression in thread. It gives you the information you need to make novel combinations of stitches that have the properties you want to see in your own art, whether or not tools exist to generate them automatically.
Understand the stitch, know the thread, explore the substrates, learn the combinations and how they interact, and the artistry of digitizing and the resulting wonder of purposeful machine embroidery will be open to you.
–—
![]() Erich Campbell is an award-winning machine embroidery digitizer and designer and a decorated apparel industry expert, frequently contributing articles and interviews to embroidery industry magazines such as Stitches and Printwear as well as a host of blogs, social media groups, and other industry resources.
Erich Campbell is an award-winning machine embroidery digitizer and designer and a decorated apparel industry expert, frequently contributing articles and interviews to embroidery industry magazines such as Stitches and Printwear as well as a host of blogs, social media groups, and other industry resources.
Erich is an evangelist for the craft, a stitch-obsessed embroidery believer, and firmly holds to constant, lifelong learning and the free exchange of technique and experience through conversations with his fellow stitch-workers .A small collection of his original stock designs can be found at The Only Stitch