Density – as it refers to machine embroidery, density is essentially a measure of the space between parallel stitches or lines of stitching. It can also be expressed as the number of such stitches or lines present in unit, as in ‘stitches per inch’.
It may not seem like the sexiest or most artistic thing one could discuss about machine embroidery, but in my opinion, it is probably the most important and most overlooked measurement in machine embroidery and digitizing. In my mind, achieving balanced densities that cover your ground without adversely affecting the drape of your garment is one of the chief hallmarks of an expert digitizer. Moreover, learning about density opens up worlds of specialty surface treatments as well as software-independent and more effective methods of achieving color blending in your work. The great thing about it is that all it takes to start learning to control density are some simple measurements and a little trial and error testing.
You may remember in an earlier article that I suggested that embroiderers all learn to use the metric system for measurements- here’s where it is the most crucial; whereas there are measurement systems that count stitches per inch, the most common systems are based either on a metric measurement of the distance between thread or on ’embroidery points’ which are still a metric-based system where 1 point is equivalent to .1mm. Luckily, the reasoning behind it is easy to grasp. The thickness of standard 40wt machine embroidery thread is roughly .4mm; this will help us define everything we need to know about density hereafter.
Now that we know that our standard thread is .2mm thick, we also know that under ideal conditions, a 2-line course of stitching spaced at .4mm or 4 points apart will lead to each line of thread just touch, edge to edge, its neighbor, thus giving us full coverage of our ground material. Admittedly, there are numerous conditions, like stitching on textured, furry, or grained materials, that may still cause havoc even at ‘full’ density, but many of those situations can be mitigated through the use of structured foundational stitching referred to as ‘underlay’ that runs before your top stitching (and which will be a subject of this very blog in the near future). The major take-away is that we should consider .4mm spacing to be our most dense setting wherever possible. There are reasons to create lines of stitching closer together than .4mm, but for almost all standard embroidery your density should be at .4mm or less (meaning further apart).
If we make our fill stitches too dense, we are forcing threads to try to lay atop each other, which will cause distortion in our designs as the crowded threads roll off of one another, increasing rippling and distortion of the surface as embroidery threads and the threads already present in the ground fabric compete for space. Moreover, as we add details, outlines, or shading atop our fills, we can create patches of thread that get thicker and thicker if we do not leave room for them in the initial layers. Though there is almost always some amount of overlap in designs, quite by necessity, adding full-density elements atop each-other will eventually build up what is often called ‘bulletproof’ embroidery, even to the point of causing thread and needles to break while trying to penetrate the dense patches of built-up thread.
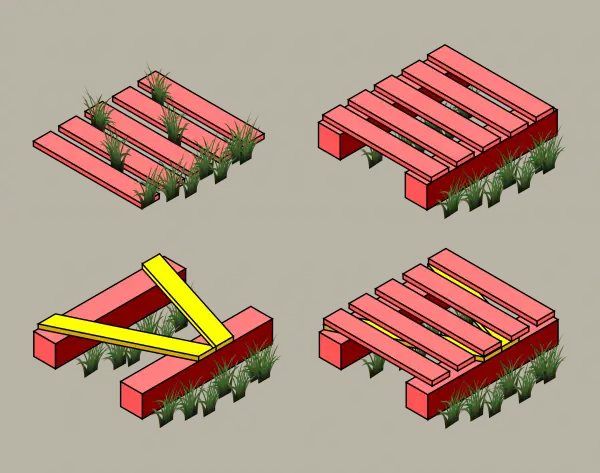
The trick is that with certain kinds of underlay, or with certain thread and color combinations, we don’t always even need ‘full’ coverage. The graphic above illustrates the way structured underlays work to lift top stitching above the texture of your ground; the deck is like your top stitching and the beams and slats below like an edge contour underlay with a zig-zag. Underlay forms the foundation for lighter stitching. Depending on the texture of the thread, the amount of contrast between the ground and top-stitching, and the way the underlay holds the thread above the ground, we may be able to use lighter densities (further spaced threads) without sacrificing coverage. If that wasn’t enough, by sampling our particular thread and ground combinations with swatches of stitching at multiple densities, we can easily see just how lightly we can stitch and achieve the amount of coverage we want. Building up these frames of reference with your materials can help you to make good decisions when digitizing. Knowing how far lines of stitching need to be apart to create a certain look or balance between the ground and the visible stitching unlocks the possibility of light, painterly fills and effects just as much as complete and balanced fills.
Machine Embroidery Density: The Basis of Blending
Earlier, I alluded to blending colors as well- while many digitizers will rely on a software tool that produces gradients, the coverage achieved by these gradients is never ideal- the threads are not positioned in any exact way, so to get complete coverage, most digitizers will either use a nearly full density in a base color upon which the blended colors are added, making for an overly dense finish and a less flexible piece, or the allow too much of the garment to show through. With some simple math, however, you can choose to blend colors and create gradients manually, even with simpler software. Knowing that .4mm (4pt) spacing gives us full coverage we can then simply make segments of stitching in different colors with percentages of that full-coverage.
Let’s say we want 3 strips of horizontal fill stitching. One with 2/3 orange and 1/3 red, one with 1/2 orange and 1/2 red, and another with 1/3 orange and 2/3 red, but that in the end, we want to achieve a density of .4mm. The first strip we execute in 3 passes, each with a spacing of 1.2mm, 2 passes of orange, offset by .4mm of course, and a third in red, placed so that the lines of stitching fall into the remaining space. For the middle stripe, 2 passes, one in each color, of .8mm fill, and for the third we use the same settings as the first, simply changing one of the orange passes to red. Now we have a simple banded gradient- it might not be super smooth with only three bands, but you can see how to build out these stripes; you simply work with multiples of your .4mm spacing and build layers up to your final density.
There’s no way that in the space of this post that we could deal with everything one needs to know about machine embroidery density, and we haven’t dealt with much more than simple fill stitches- that said, there is still a critically important take-away, even from this short piece; if we want flexible decorations and garments with an overall good hand, we must be aware of how densely we cover (and punch threads through) our ground, using only the stitches we need to achieve the level of coverage we want. To be aware, we must know the thickness of our thread and how it behaves when stitched; luckily for us, industrial standards make that easy with our most-used thread. Our work will only improve when we take the space between the stitches as seriously as the stitches themselves.

