Box-It Front View

Confessions of a cross stitcher – Getting Boxed In

Confessions of a Cross Stitcher

Happy 2020 all my stupendous cross stitchers! Are you ready to get going this year on all kinds of incredible cross stitch projects? Yes? Me too so let’s get started!

Get Boxed In

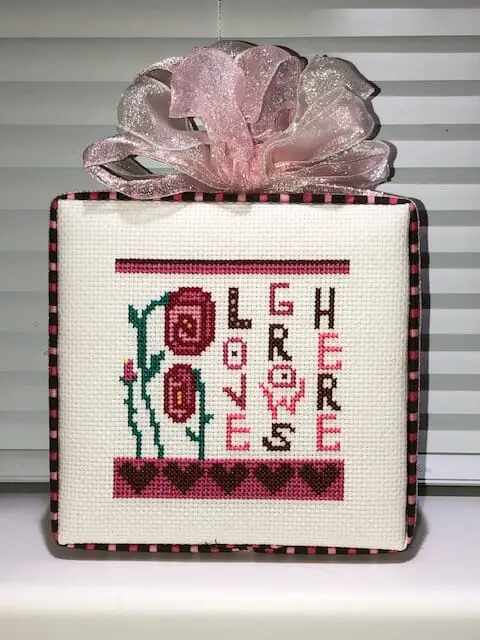
When we had a brick and mortar cross stitch shop in the nearby area, I  would take my smaller projects there to get finished to what we called a “Box-It”. Now what is so super cool about this finish is the variety of places they will fit, how you can decorate them up, and how easy they are to do yourself. I think you will really enjoy this way to showcase your projects without framing!

In order to show you the steps I have reverse engineered an original of mine that was done a while back. Here we go!

Box-It Front View - from boxed in article
The finished Box-It. It is a nice size that fits well on my kitchen windowsill.


Back view of the Box-It.


Side View of Box-It
On this side view you can see it is thick enough to stand easily on its own and the fabric is a different pattern, which is an option that can be used. Also note the ribbon that wraps around the side is transparent so the pattern shows through.


Foam Core Board Base
The base of the box are layers of foam core board that are glued and taped together. This group consisted of about 8 pieces of foam-core of approx. .25 inch. They are about 5.5″ square.  A thin quilt batting is then cut in a 5.5″w x 11″l rectangle, folded over and then glued to the front and back of the foam-core. The picture shows the circle of glue where the batting was glued.


Stitched piece for Box-It.
The stitched piece that will go on the front side of the Box-It. It measures about 7″x8″ that includes about a 2″ fabric border all around.


Box-It back side material
Cut your fabric for the back making it approx. 8.75″ x 7″. Of course you will cut the proportions according to your own project size.


Pins for Box-It.
Lot’s of short pins are needed to pin it all up. Stainless steel is preferable since it is less likely to rust. These are used in lieu of glue but you can experiment with glue if you really want to use it instead. The pins make it easy to adjust where necessary and hold tightly to the foam core.


Pinning the back of Box-It.
Pin the back fabric first as indicated by the blue dots below them. Repeat on the other three sides.


Pinning the design to the front.
Pinning the design to the front. You can see it has a lot of pins to keep it secured. Dog ear fold the corners. When you push them down pin them as well.


Design all pinned down.
Corners pinned down and ready for next step.


Box-It band
The band that is wrapped around the Box-It was cut about 24″ long and twice the width of the side measurement. A piece of thin batting is cut half the width of the material to fit in the center. the edges are then folded over it on each side. Press it down.


Box-It band attach.
Start on the bottom of the Box-It in the middle pinning the band down. Fold it over the pinned area and around the Box-It.


Box-It band pinning
At the bottom tuck both ends under and pin as shown. You do not need to pin the band anywhere else. Wrap your ribbon around the Box-It and pin at the top. Add a bow or whatever embellishment you want to make it your own.

There are many ways to innovate this design so don’t be afraid to try different ways to make it. Try it with the Mr. X Stitch 2019 Christmas cross stitch design for next Christmas. Who wouldn’t want a gift this lovely, or one for yourself, to display?!

So what’s so great about Box-Its, EVERYTHING! Easy to store, time-saving, money-saving, customizable, and oh so pretty, you can put them just about anywhere. A great way to display those smaller projects you want to show off year-round or seasonally.

Until next month, Keep Creating!

Share The Love

Want More of the good stuff?