

Embroidery Digitizing in the Real World
Digitizers-in-training justifiably bemoan the lack of a single, clear-cut methodology for creating embroidery designs. Whether a digitizer starts as an embroiderer, or is dumped into the world of stitch-types and settings from a background in design or art, they are swamped with techniques and tools that all accomplish a similar end, even though working with each may differ greatly in how shapes and stitches are defined. Though we’ve left behind the dawn of digitizing where punchers set each stitch on a wall-sized tablet from 6:1 scale drawings, we can’t yet rely on the promise of automatic conversion to create a quality embroidered result.

Between these extremes of effort lies a field of realistic options for creating machine embroidery designs; a mix of manual drawing, vector tweaking, and partially-automated stitch settings that makes up the real work of digitizing. A look at the methods in this middle will help those of you preparing to create your own design files to know the advantages and ailments of each method, or at least why some digitizers flock to a certain way of working.
Design Import vs. Drawing
When I started, vector import wasn’t even a possibility, despite the fact that I didn’t come up in the era of scale drawings and having a ‘cartoonist’ spec my a design on billboard-sized sheets of paper for me to digitize. All work required me to trace shapes over a scan or raster image. Rather than tell you to get off my lawn or wax poetic about the old days, I’ll admit that it wasn’t always ideal, even if it was better than entering each stitch one at a time. The hard bit is that raster art (think JPG or PNG files) can often be rough; they are lossy, anti-aliased, and provide far less defined edges, even when zoomed in, than you’d want when drawing the vector shapes that you’ll shortly fill with stitches. A great digitizer was one that could guess what a shape should have looked like if the art was clear. In recent years, it’s much more common for people to be able to find or produce a vector source file (think AI, EPS, or the ever more common SVG) for their pre-stitch art.

This ubiquity of vector introduces a new wrinkle into the discussion about methods; rather than debate the vector vs. raster for their respective quality for tracing templates, new digitizers ask of this vector source, ‘Do I really need to draw this again?’ With software almost universally able to import vector, there is a valid reason to question whether or not simply importing a vector drawing and assigning stitch settings to each element provides a time savings versus redrawing, despite what one might trade in stitch quality for that convenience.

Working from Vector: Treasures and Trials
The obvious pro of clean edges and infinite zooming that vector grants is helpful for the fans of drawing your own embroidery shapes like me, but what brings most people to love vector is the idea of not having to redraw everything, since software will allow you to set stitch settings on an existing vector shape. Though that is possible, it doesn’t always save as much time as you might think, since the shapes in any art meant for print or digital use aren’t made with embroidery in mind.

Print designers and clip-art mavens stack unseen objects, add superfluous borders and masks, and create shapes that can’t be rendered in stitches. What looks like a border behind that SVG badge may be an inflated full-coverage shape that sits behind all other elements and takes a great deal of work to be the size and shape of a columnar satin border. In vector text, serifs and strokes on lettering you’d split and render separately when working in satin stitches will be a single slab of color, forcing you to cut elements out of each glyph and resize those too small or too large for the limitations of satin stitches at your finished size. More than that, the effects of pull and push distortion won’t be compensated for, meaning shapes will distort, the baselines of lettering will jog up and down, and outlines and objects that should touch will fall out of register and leave gaps between them. When a design is properly digitized for embroidery, shapes are drawn distorted to counteract the natural stresses in the work, sized correctly, and all overlaps and junctions are properly layered.

Last, but far from least, anything you do to create additional texture with the natural dimension of embroidery requires you to draw or do extensive editing to the flat shapes common in print art. If you want to carve stitches of many angles, stitch types, and textures to break up the silhouette of an object for depth, it will be time-consuming working from a singular flat object. Those who lean too heavily on vector imports often render objects in a single-angle flat fill; it’s the easiest way to fill an area with stitches on-screen, but not only are those objects a bit dull to look at when embroidered, filled complex shapes with holes can often be inefficient due to all the travel stitches needed to for the machine to fill the many branches and protrusions in the shape.

Rallying for Redraws
In truth, instead of ‘saving’ time with existing vectors, you’ll find yourself editing extensively to increase the size of small elements and gaps so that they’ll stitch well or stay open, recreating more reasonable shapes for embroidery, and frequently breaking flat shapes into discrete pieces that serve your needs. This constant need for cutting, increasing overlaps, and tweaking curves makes a total redraw seem more reasonable. Though redrawing has the drawback of requiring you to recreate every shape, the feeling of it being more time consuming than a vector conversion is not always true to a timed trial. If you have a passing knowledge of how embroidery works and any ability with some version of digital drawing tools, the likelihood is that you can redraw your art for embroidery faster than you can edit down any decently detailed piece.

Redrawing with embroidery in mind means you work in a reasonable sequence for the machine, layer things dimensionally, and draw shapes with the right distortion and layering for a clean stitchout. With your monitor calibrated and ruled grid lines visible for an easy frame of reference to a piece’s finished size, you’ll quickly be able to see where elements are too small to stitch, too close together, or need more overlap to keep registered. More than that, you can make changes on the fly, reducing details that won’t render in thread, thickening elements too narrow for your chosen stitch type, and adding elements that bring out the best in an embroidered piece, instantly applying embroidery attributes to each shape along the way. Editing will be less intense, and your embroidery will be interpreted from the source into its best, most dynamic form rather than desperately trying to recreate a piece from print that doesn’t take the needs and benefits into account.

Tradition and Trends in the Toolbar
No matter if you choose to trace over a JPG or lock that SVG on your lowest layer, deciding to draw your embroidery elements isn’t the last decision you’ll have to make. Every digitizing platform has a host of tools to create shapes from the original stitch-type specific entry to the vector-style inputs designers crave. Because modern software rightly lets you apply any stitch type to any shape that can reasonably use such, you can almost always use any tool that suits you to create most shapes, and with modern, designer-friendly tools linked less to stitch types, those with vector software experience are sure to find familiar friends in the toolbar.

Old-School Stitch Setting
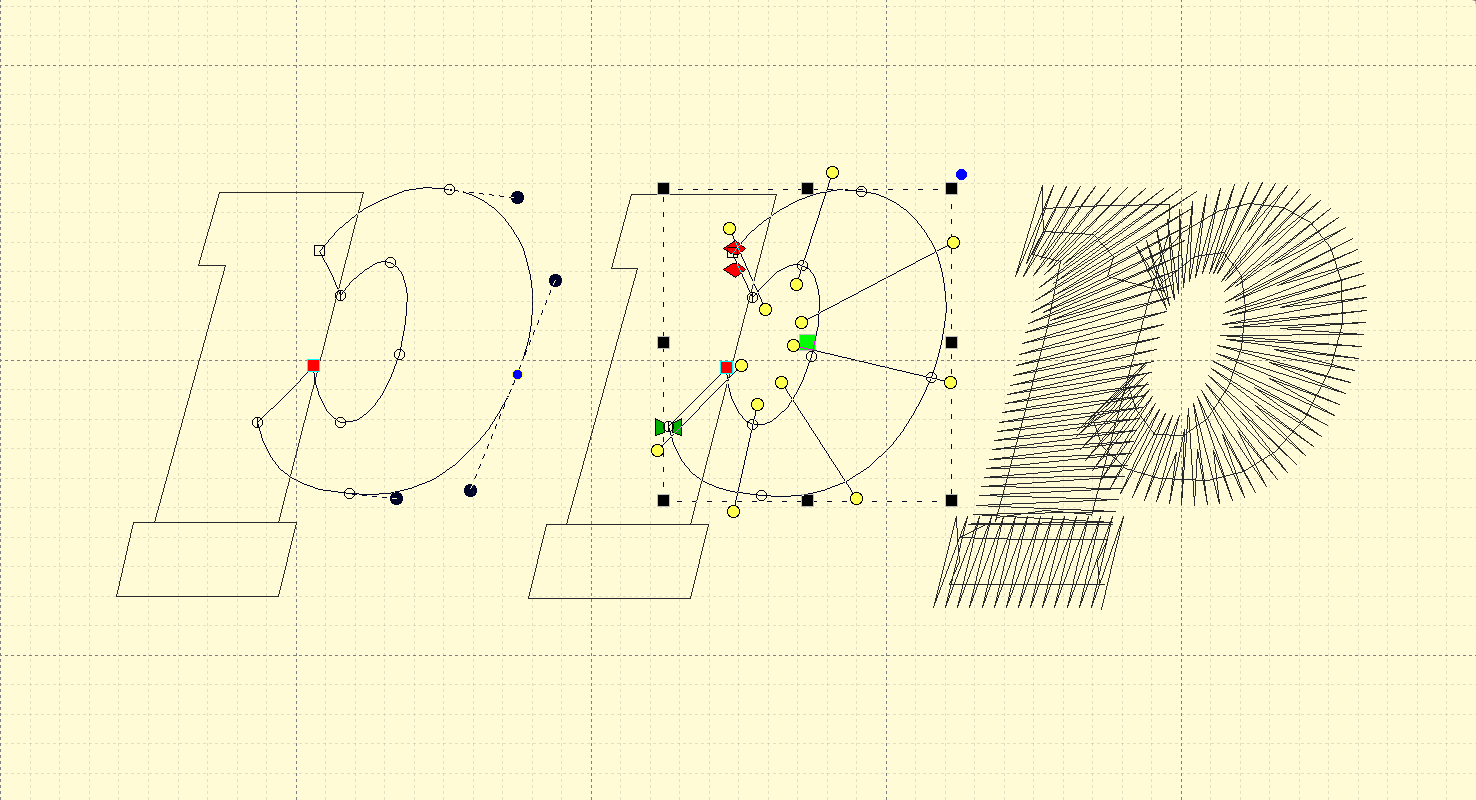
Traditional tools create shapes specifically suited to a stitch type. Satin stitches largely end up as narrow, columnar shapes with stitch angles defined along the length of the column; that means satin column tools create columns with either alternating points bouncing from side to side with angles at every pair, or one side drawn at a time followed with setting stitch angles. Single thickness satin strokes are made with a single line tool that keeps stitch angles perpendicular to the satin edges, and mostly maintains uniform width. Fill stitches are unsurprisingly meant to fill larger fields, so general area-defining drawing tools set the outer border of the fill, but often prompt users to add holes determine a stitch angle after the border is complete. Straight stitches, bean stitches, and motifs follow lines and curves like a single width border, but are automatically set to their stitch type on creation. All these shapes can be altered and assigned different stitches, but their specificity helps you visualize how your shape should be made to suit your stitches, particularly helpful if you aren’t acclimated to the needs of stitches before you start.

New-Style Tools, Old Hat for Vector Artists
Open shapes, closed shapes, and columns are all you usually see in the new-style drawing segment. Really, there’s very little difference between the shapes they make and those made by the old school tools, they just have fewer hints for those who aren’t used to embroidery design. Drawing an open shape gives you a line, much as the ones used for single-width satins and run stitching, and creating a closed shape gives you either an area to fill or a narrow shape for satins depending on the size and aspect. For a vector artist with enough embroidery knowledge, these new graphical inputs should be easy to navigate. After all, the real trick is knowing when a column is too wide or too thin for satins, how distortion is accounted for, or how to set even passes of straight stitch- if you know what stitches to use and their limitations, how you define the space they take up is fairly trivial.

Curves Ahead
One difference does stand out between the traditional way most digitizing software defines lines versus the method vector software and vector style tools employ; though it has more to do with speed of entry than finished quality. This is the difference between the two methods for input or editing available in most embroidery digitizing software; Splines and Bezier curves. Graphic artists are masters of the Bezier curve’s handles on those curved, cusp, and line points, and are comfortable creating and refining them. Properly placing nodes and setting their aspects and angles by dragging their handles is a familiar sight. Splines are more commonly familiar to those who started as digitizers. They are a bit messier, but easier to manage; either curve or corner nodes are placed along a line with curves automatically calculated to best fit the nodes and the node types. More precise tracking for a curve only requires you to add more curve nodes until it behaves. Corners just need a cusp point, and the software breaks the continuity of the line as expected. It’s very quick, albeit less precise than Bezier. By default, many digitizing software packages draw with these quick splines, but most allow at least the editing phase to be carried out via Bezier tools as desired.

The divide between spline users and bezier users is really about comfort; I find spline input fastest for complete beginners to any sort of vector drawing, but designers-turned-digitizers find fully Bezier-based workflows easier than the springy automated spline curves. Even those that choose spline input may prefer the precision of manipulating their art in Bezier mode once they learn how to work those iconic handles.

Putting it all Together
Ultimately, any input method can result in excellent embroidery; tools never make the work good, only the knowledge of the medium and the creativity of the user can do that. Tools may be faster or slower for you, but if you learn how thread, needle, fabric and stabilizer interact with your design and when to compensate for distortion and how much to overlap objects, any drawing style will do. There is merit to understanding how your tools affect your choices and your work, but if you make the effort to visualize thread, to ‘see’ art in stitches, you’ll already know the shapes you need. All you have to do is test every tool, and find the one that smoothes the friction between the stitching in your mind and the act of plotting the design on the screen; no single method may be right, but one may be right for you.

![]()
Erich Campbell is an award-winning machine embroidery digitizer and designer and a decorated apparel industry expert as well as an industry educator appearing at several trade-shows as well as teaching online. He frequently contributies articles and interviews to embroidery industry magazines such as Printwear, Images Magazine UK, and more as well as to a host of blogs, social media groups, and other industry resources.
Erich is an evangelist for the craft, a stitch-obsessed embroidery believer, and firmly holds to constant, lifelong learning and the free exchange of technique and experience through conversations with his fellow embroiderers. A small collection of his original stock designs can be found at The Only Stitch

