Welcome to A Stitchalicious In Time where we share tips to help you elevate your stitching skills!
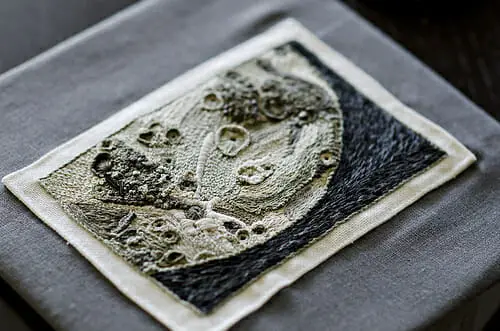
This month I’d like to go into textures a bit more. Sure, we know that texture is this cool thing that you automatically get with embroidery (otherwise why not, y’know, just paint?) but most of us don’t really aim for it specifically or put thought into the details of it.
So to start I’m proposing that we (dum dum DAAAAHHH) put down the bright red and take a step back from our colourful thread box. I know this is hard….
(…yes, I know, I have a problem. But I AM seeing someone about it. I call him Dr Gutermann and he’s being very helpful with my thread addiction. But back to the issue at hand…)
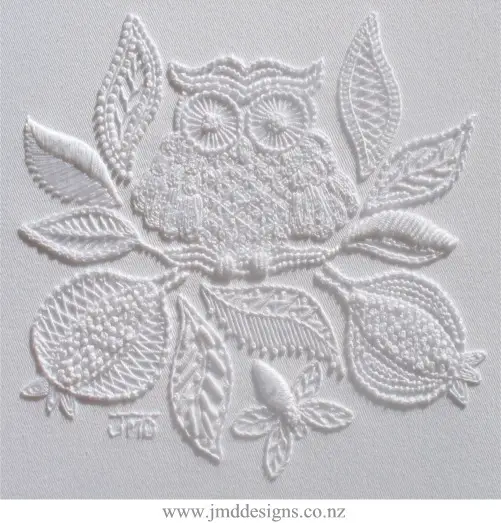
One of the most useful ways of learning how to work with texture is to reduce your available colour palette. And if you want to really learn something go with just a single colour. In fact, seeing as we’re all about pushing our boundaries and learning the tuff stuff here, let’s do white. Just white. On white fabric. No creams, pale yellows, light greys… white on white.
There are a few techniques out there that tend to the monochromatic palette – Mountmellick, drawn thread such as Hardanger, pulled work, several lace-making techniques – and all bring different ideas and methods for making images pop despite the lack of colour. Here’s a few ways you can start on your own, without needing to get into the intricacies of a new technique.
Making It Stand Out
First things first, if we have a picture to stitch white on white, we need to make sure we can pick it out somehow. We’re going to need threads that don’t disappear into the fabric – so silks or single strands of cotton floss are pretty much out. Think of thicker cottons, perles, wools. Anything that will really break up the fabric background and, preferably, stand physically out on the surface. Don’t have any of those to hand, just grab your six stranded floss and use 3 or 4 strands instead of the usual 1 or 2.
We can stick to our old standards for outlining stitches – stem, chain, split – but also think of expanding into ones with even more texture to them, such as cable stitch, coral stitch or even a line of french knots.
Filling It In
Now that we can’t rely on colour to define the separate sections of our stitched design, we’ll need to break it up with filled in texture. Again, look at the possibility of mixing various kinds of thread. Bring your silks back in here with a smooth satin stitch, but have it butt up against a wool that’s been couched. Why not? That’s a serious texture contrast we’re talking about right there. But you don’t have to change the thread, sticking with floss and changing your stitches are more than enough. Fill an area with chain or split stitch, try out herringbone or fly stitch. Go through your stitch dictionary and grab anything where the stitches overlap each other. Start padding your stitches by layering them over straight stitches to make them more raised. Try doing that candy skull in chain stitch, with buttonhole stitched eye holes and padded satin stitched teeth.
Texture isn’t just randomness
It’s easy to get a bit lax with the neatness when thinking “I’m trying to add texture” but not all texture is good. Without the guise of a brilliant colour to hide it, that imperfect stitch in the middle of a line or filled area can really throw out the whole textural pattern. Look at really perfecting the stitches individually so you can experience the true beauty of the stitches’ texture on your work. In the end, hand embroidery it is too much work invested in a single piece to get lazy with one or two stitches, right?
White isn’t the end
I’ve suggested white on white so that you can really push the textural aspect of your embroidery without allowing yourself to fall back on the use of colour for definition, but of course, the aim is to bring that knowledge and experience back into the rest of your work. You’ll find that with an enhanced textural palette you can do amazing things with even a limited colour palette and, with such skills in place, well the sky’s the limit. Right Rachel?
If you want other ideas on working with your stitched surfaces, check out our Beneath The Folds column!
—–
Jacinta Lodge is the embroiderer behind Stitchalicious, and purveyor of graffiti cross stitch patterns via StitchaliciousDesign. Her embroidered artworks have been shown in exhibitions in Germany, the UK and Canada and published in The Anticraft and Indie Craft. Jacinta is Australian, but lives in Berlin, Germany, where she does roller derby and listens to her husband hark on and on about VW buses.

